OK, I'm getting excited now! The idea is that we will be comparing home made breads using Heron Corn Mill flours with other home made breads using commercially produced flours. Will we be able to taste the difference between stoneground and roller milled flour? And how about the difference between organic and "conventional" grain? Which makes the bigger difference to the taste - how the grain is grown, or how it is milled? Should we be fussy about these things, or is there an element of hype in all this? Should we be thinking about the planet? Or our digestive systems? Or just the taste? If nothing else, home made bread usually tastes great!
I've already started getting my stuff together for baking tomorrow evening. Here are my basics - four different flours to set the characteristic tones for my breads -

Heron Corn Mill stoneground wholemeal wheat and spelt take pride of place in the middle; a commercially produced stoneground wholemeal wheat from Tesco; and a stoneground white from Gilchester Organics for use in my sourdough among other things. In the front is my starter culture for the sourdough, and some fast acting yeast for the others.
I think these should give quite a lot of room for interesting comparisons. And I know for sure that the Heron spelt flour is absolutely fantastic for flavour. As I'll be baking on a hot stone (4 hot clay tiles, actually!) I am expecting to have some good crust on my breads, and I'll be adding some texture and extra flavours just for interest.

I've snook in a few extra flours here - a stoneground wholemeal wheat from Little Salkeld Watermill near Penrith; a very robust organic rye from Swaffham Prior Windmill near Ely; and Allinson's roller milled white - an irresistible bargain at £1 a bag in Asda. In front of them are my "textures" that I will be liberally adding to most of the breads. From left to right - rye flakes, golden linseed, wheatgerm, and cracked wheat. A couple of spoons of any of these gives most loaves a nice lift.
Just for fun, I will be adding some fragrant ingredients as well. If I have time I'm hoping to do a rosemary focaccia. One of my wholemeal wheat breads will have a pinch of caraway seeds, which will be interesting to compare to a "vanilla flavoured" wholemeal wheat. I will be trying to copy a wonderful thing I had from Simon Thomas at Staff of Life in Kendal recently. His white bread with herbs running through was a thing of rare beauty. Whether I can get anywhere near the sublime subtlety that Simon achieved remains to be seen!

I often use polenta to stop my bread sticking to the peel on the way in to the oven. It gives a nice crunchy bottom, which is a very nice effect, I think. It can also add a nice bit of crunch to an otherwise plain white loaf. Likewise semolina can just give a little bit of extra richness to an otherwise fairly light loaf.
I foolishly mentioned my parkin was a legend in the family, and of course I was instantly challenged to do one for the heritage open days at the mill. So, I'll be slipping a parkin in at the bottom of the oven when the bread is at the top. Fingers crossed I don't burn it!

So, first up - get the sourdough sponge started. This is a quarter sponge - 75 grams of flour for a 300g loaf.

If you haven't tried a sponge, you really should - it adds to the flavour very noticeably. The basic idea is to mix a quarter of the flour, half the water and no salt the day before you will be baking. You can either add some yeast, or some sourdough culture, and then just let it alone to do its thing for a number of hours. There doesn't seem to be a correct length of time - it all depends how much yeast or sourdough you add, how warm the room is, how warm the water is, and so on. I'm leaving mine for 24 hours, so it is quite possible I'll find it is quite strong at the end, but my sourdough culture is not particularly violent, so I am taking that risk.
In with the flour and a couple of spoons of the sourdough culture.

Add some tepid water.

Give it a good stir, and hey presto! You have a sponge.

Leave it well alone for a few hours.

And it will look a bit more frothy.

Now it's time to let nature get on with the job, and I'll start again tomorrow, with a bit of serious home baking. Watch this space!

Next day...
Here we are again, the day before the first Heritage Open Day at Heron Corn Mill, and lots still to do. OMG, OMG, OMG!
First up, move my sourdough on from being just a sponge to something a bit more like a loaf. The Gilchester flours are quite hard work - presumably the gluten level is relatively low. Whatever the cause, (I have asked them via their web page, but no reply) this flour needs quite a lot of TLC before it starts to feel like responsive dough.
I made my first mistake of the day by putting in enough water for my normal 2 loaves, when I was only intending to do one. Rapidly changing to plan B, I added enough flour to make 2 loaves and got kneading.

With a fair amount of elbow grease, and some more water to adjust the consistency, I finally got something that felt nice and smooth, so I split this in half and added herbs to one half and walnuts to the other half. This is probably my second mistake of the day - the nuts should probably have gone in much later, but hey - let's see what happens.
Next job, start the sponges for the Heron wheat and spelt loaves.

These will take less time than the soudough sponge, because I've added some yeast this time. You can see the mixture is nice and sloppy. This is just what the yeast likes - moist warm conditions, and no salt - so these will look quite different in an hour or so. But I'll be leaving these for longer than that because I'm off to Lancaster for a 2pm matinee performance of She Stoops to Conquer, complete with big hair and Northern Broadsides' usual great northern accents.
Before I run for the train, there's just time to carefully document the bread by slapping a piece of paper on top of each bowl. Now time and mother nature can get on with making my dough rise and my sponge bubble.

Later...
Well, when I got back from the show, the sourdough was well risen. I suppose with a 24 hour sponge and a 7 hour rise, it would have been surprising if it wasn't well risen. But it just goes to show that given time, your bread will get there in the end. And it will probably be all the better for rising slowly.

You can see that when I turned the dough out, there were some satisfyingly large bubbles and the texture was nice and open.

So I just gave the sourdough 3 quick folds and put it to prove in the baskets near the oven. You can also see that shaping is not my strong point!

However, bread is nothing if not forgiving, and these "interesting" looking loaves tend to turn out just fine in the end. The Heron Mill spelt and wheat loaves didn't really look much better after being mangled by my best efforts at shaping.

When the sourdough came out, that nice open texture was well in evidence. A good bold slash exposes what's happening inside, as well as letting the bread expand freely in the oven.
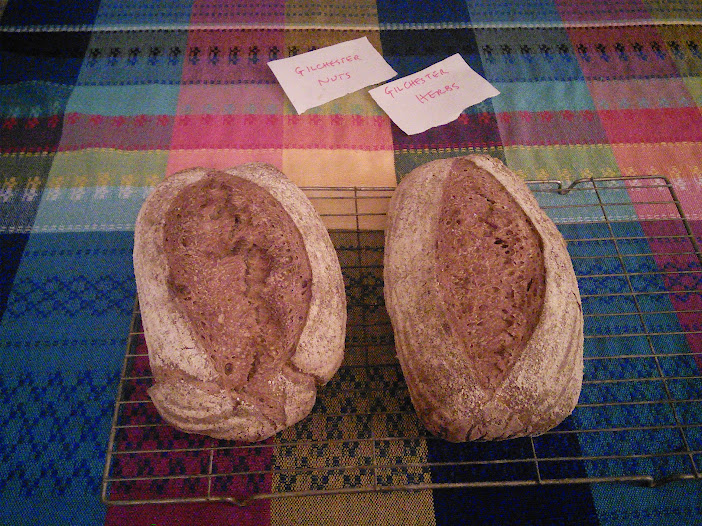
Admittedly the nut loaf on the left has cracked a bit at this end, but that's the baker's slice anyway, and I'm not complaining! Look at those stretch marks in the middle of the herb loaf on the right! Fantastic. I can't wait to find out how the herbs have turned out. Sometimes they can just get lost in the cooking, but I was fairly liberal this time, and it looks like a happy loaf, so I am pretty hopeful.
The Heron spelt didn't behave as well this time as it has done before, for some reason. Maybe I didn't give it enough TLC at the kneading stage. The Heron wheat, on the other hand, was very lively, and rose the better of the two.

Just for fun, I snook in an olive focaccia as well as the famous parkin, and a couple of baked apples. I like to get value for money out of my baking stones.

Nell Dale will be doing some live cooking in the Mill tomorrow as well, so there will be lots to talk about and sample. The theme for the Heritage Open Days at the Heron Corn Mill is "Tour and Taste", so why not come along and join in? It'll be fun!
Heron Corn Mill "Heritage Open Days" this Thursday, Friday, Saturday and Sunday. Milling and bread things going on in the mill, and Heron Corn Mill stoneground flour to buy in the barn. See you then!
Here we are again, the day before the first Heritage Open Day at Heron Corn Mill, and lots still to do. OMG, OMG, OMG!
First up, move my sourdough on from being just a sponge to something a bit more like a loaf. The Gilchester flours are quite hard work - presumably the gluten level is relatively low. Whatever the cause, (I have asked them via their web page, but no reply) this flour needs quite a lot of TLC before it starts to feel like responsive dough.
I made my first mistake of the day by putting in enough water for my normal 2 loaves, when I was only intending to do one. Rapidly changing to plan B, I added enough flour to make 2 loaves and got kneading.
Next job, start the sponges for the Heron wheat and spelt loaves.
These will take less time than the soudough sponge, because I've added some yeast this time. You can see the mixture is nice and sloppy. This is just what the yeast likes - moist warm conditions, and no salt - so these will look quite different in an hour or so. But I'll be leaving these for longer than that because I'm off to Lancaster for a 2pm matinee performance of She Stoops to Conquer, complete with big hair and Northern Broadsides' usual great northern accents.
Before I run for the train, there's just time to carefully document the bread by slapping a piece of paper on top of each bowl. Now time and mother nature can get on with making my dough rise and my sponge bubble.
Later...
Well, when I got back from the show, the sourdough was well risen. I suppose with a 24 hour sponge and a 7 hour rise, it would have been surprising if it wasn't well risen. But it just goes to show that given time, your bread will get there in the end. And it will probably be all the better for rising slowly.
You can see that when I turned the dough out, there were some satisfyingly large bubbles and the texture was nice and open.
So I just gave the sourdough 3 quick folds and put it to prove in the baskets near the oven. You can also see that shaping is not my strong point!
However, bread is nothing if not forgiving, and these "interesting" looking loaves tend to turn out just fine in the end. The Heron Mill spelt and wheat loaves didn't really look much better after being mangled by my best efforts at shaping.
When the sourdough came out, that nice open texture was well in evidence. A good bold slash exposes what's happening inside, as well as letting the bread expand freely in the oven.
Admittedly the nut loaf on the left has cracked a bit at this end, but that's the baker's slice anyway, and I'm not complaining! Look at those stretch marks in the middle of the herb loaf on the right! Fantastic. I can't wait to find out how the herbs have turned out. Sometimes they can just get lost in the cooking, but I was fairly liberal this time, and it looks like a happy loaf, so I am pretty hopeful.
The Heron spelt didn't behave as well this time as it has done before, for some reason. Maybe I didn't give it enough TLC at the kneading stage. The Heron wheat, on the other hand, was very lively, and rose the better of the two.
Just for fun, I snook in an olive focaccia as well as the famous parkin, and a couple of baked apples. I like to get value for money out of my baking stones.
Nell Dale will be doing some live cooking in the Mill tomorrow as well, so there will be lots to talk about and sample. The theme for the Heritage Open Days at the Heron Corn Mill is "Tour and Taste", so why not come along and join in? It'll be fun!
Heron Corn Mill "Heritage Open Days" this Thursday, Friday, Saturday and Sunday. Milling and bread things going on in the mill, and Heron Corn Mill stoneground flour to buy in the barn. See you then!


